Locally Cached Nix CI with Woodpecker
Published on
Motivation
I’ve been migrating my repositories off from GitHub to Codeberg for public repositories under free licenses, and to my own instance of Forgejo for private or non-free repositories. One crucial functionality that I needed was a CI/CD system. While Codeberg provides access to its experimentally hosted instance of Woodpecker CI on a per-user basis, I don’t feel like taking advantage of their public service to deploy this blog and some other shady personal projects.
As Woodpecker can be self hosted, the obvious solution is to run my own instance of it, which led to the next problem – Downloading and building the same set of dependencies for each job repeatedly wastes bandwidth and computation. Although I didn’t care about resource usage at all when exploiting GitHub free-tier offering, I do care about it now that the jobs are running on my own hardware.
It turned out that there’s a blog post by Kevin [1] describing how to cache the Nix store for GitLab Runner. I adapted their approach to Woodpecker, hence this post.
Assumptions
- NixOS machine(s).
- A domain name.
- Some familiarity with Nix. This post does not hand-hold you through the detailed process.
Brief Steps
Create an OAuth2 application on Codeberg (or any Git hosting service of your choice). On Codeberg, this is done at https://codeberg.org/user/settings/applications. The “Redirect URI” should be
https://your.woodpecker.domain/authorize. Save the client ID and client secret for later use.Generate an “agent secret” by this command. This is a pre-shared secret for communication between the Woodpecker server and the agents (i.e. runners).
openssl rand -hex 32Setup the Woodpecker server, which is responsible for communicating with the Git host, serving the web UI, and dispatching jobs to Woodpecker agents (i.e. runners).
The server configuration environment variables are listed on the Server configuration doc page. A bare minimum config should contain these variables:
WOODPECKER_ADMINWOODPECKER_HOSTWOODPECKER_GITEAWOODPECKER_GITEA_URLWOODPECKER_GRPC_ADDRWOODPECKER_SERVER_ADDRWOODPECKER_GITEA_CLIENT(from step 1)WOODPECKER_GITEA_SECRET(from step 1)WOODPECKER_AGENT_SECRET(from step 2)
My server configuration is in this file. Do note that my setup has a Nginx proxy in front of the Woodpecker server. The proxy is optional, and you can have Woodpecker handle HTTPS on its own by setting
WOODPECKER_LETS_ENCRYPT=true.Setup the Woodpecker agent.
The agent configuration environment variables are listed on the Agent configuration doc page. A bare minimum config should contain these variables:
WOODPECKER_SERVERWOODPECKER_AGENT_SECRET
Additionally, to use the Docker-compatible API provided by Podman,
WOODPECKER_BACKEND=docker
DOCKER_HOST=unix:///run/podman/podman.sock
Note
Rootful Docker has trouble with Nix’s
--storeoptionI chose to use Podman specifically due to previous difficulties getting rootful Docker work with Nix’s
--storeoption. Your mileage may vary, but I met with this error message.error: setting up a private mount namespace: Operation not permittedNote
Podman DNS in Nixpkgs
It’s required to set the following options when using Podman from Nixpkgs. Otherwise, the CI jobs in containers can’t resolve domain names and thus fail to clone Git repositories1.
virtualisation.podman.defaultNetwork.settings.dns_enable = true;
networking.firewall.interfaces."podman+" = {
  allowedUDPPorts = [ 53 ];
  allowedTCPPorts = [ 53 ];
};
My agent configuration is in this file.
Test the setup by creating a repository with a
.woodpecker.ymlfile, enabling and trusting the repository in Woodpecker’s web UI, and push. The YAML file should look like this. Replacegreetwith the name of the flake output to be executed.pipeline: run-greet: image: nixos/nix commands: - echo 'experimental-features = flakes nix-command' >> /etc/nix/nix.conf - nix run --store unix:///mnt/nix/var/nix/daemon-socket/socket?root=/mnt .#greet -L volumes: - /nix:/mnt/nix:roThe approach of mounting
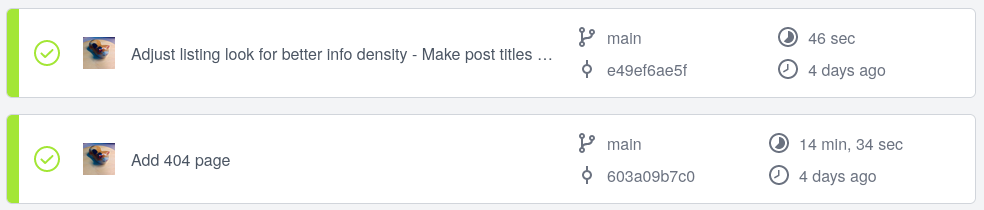
/nixinto/mnt/nixand using the Unix socket (--store unix:///...) to communicate with the host’s Nix daemon is credit to the post by Kevin [1].Try running the same build multiple times. You should be able observe subsequent jobs running much faster thanks to Nix’s caching. For example, shows the later build of this blog being much faster than its previous build.
Note
Exposing the host’s Nix store
Exposing the host’s Nix store directly to the containers has some security implications. The Nix store is world-readable, so doing so gives the CI jobs the ability to read any sensitive data, if present in the Nix store.
If this is a concern for you, Kevin’s post has some other options that doesn’t bind-mount the host’s Nix store.
See discussions on https://discourse.nixos.org/t/podman-containers-dns/26820/4↩︎